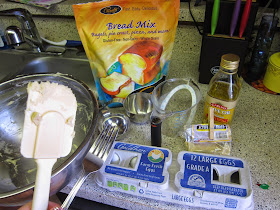
I'm going to start with the bread recipe I use and the pizza recipe because they use the same mix and because I made them the same day when I took pictures. :)
First, I've done an elimination diet to find out what foods bother me and what are okay and I can't have gluten or anything with corn derivatives (which is SO sad because my favorite food ever is popcorn! No more popcorn for me...)
If you don't have a gluten allergy or see a noticeable difference in how you feel when you do or don't eat something with gluten then don't bother doing all this! But for those of you who feel better when you avoid gluten here's an easy way to get started and not feel totally deprived
What I look for when cooking is the balance of cost (reasonable) with amount of time spent (gluten free from scratch is pretty intense!) and taste. If any of these are off I won't do it again or very often.
Note: I HAVE found an acceptable alternative to practically anything that I've craved. Living gluten/corn free doesn't have to be terrible. It takes more time yes, but I'm not suffering. The only real hardship is when I try to eat out or at anyone's house. It's just so much easier to bring my own food!
And now to get on with the food!
The mix I use is called Pamela's bread mix and I get it from Amazon with their subscribe and save program I ALMOST follow the recipe they have on the back, but with slight changes. This is what I do.
------------------------------------------
1 and 1/2 cups of the bread mix
1/4 cup olive oil
3 eggs
1 and 1/2 cups of hot water (hotter then your body temperature but not hot enough to burn you)
2 and 1/4 tsp active dry yeast
Mix it all together (I do this by hand because it's simpler) spray a bread pan with olive oil, put the dough in and let it rise for an hour.
preheat the oven to 350 and bake for 70 minutes
----------------------------------------------
They do have an egg free alternative and a yeast free one as well. The yeast free one uses baking powder and you don't have to let it rise for an hour. WHICH is pretty nice and it's quicker. The yeast free one turns out much fluffier and more like white bread. I think the texture, though amazing at first, lasts even less time then the yeast version though.
I don't usually do the yeast free version because baking powder is made with corn starch and baking soda. Anything with corn just doesn't work for me and I haven't bothered to make my own baking powder (with tapioca starch) yet.
Something to be aware of--
Gluten free baked goods tend to be dryer and crumble more easily and though at first they can taste as good or BETTER then their gluten counterparts-- this bread will only last (really) no more then 3 days (taste/texture-wise).. and by the 3rd day you should probably toast it to enjoy it the most.
As you can imagine, the bread that you buy frozen in the store is naturally going to be the worst version of gluten free baking. Everything is better fresh, but gluten free things are extremely NOTICEABLE in how they taste the day it's baked compared to even a day later. Older bread makes great french toast and croutons though! AND even a base to a breakfast casserole or meatloaf!
It is SO worth it to make your own and this took me about 10 minutes to mix up. The hour of rising and 70 minutes of baking and 20 minutes of cooling after that are really not a big deal considering how many other things you can do in that time. Plan your time well and you'll be set!
 |
| So here's how I do it. Throw all the ingredients in a big bowl. |
 |
| Picture of my tools and ingredients. |
 |
| Just a little note about how I measure pushing the flour into the cup and smoothing it across the top without even touching it! |
 |
| I've consistently gotten good results doing this, but your oven might cook differently from mine and you might need to adjust the cooking time or temperature slightly. |
 |
| I set my timer for 50 minutes while it rises in the bread pan and the last 10 minutes I turn the oven on to let it heat up before putting the bread in. Total 60 minutes of rising... |
 |
| When I first put the dough in this pan it was below the edge of the pan and now after rising it looks like this! |
And now for the PIZZA!!! While my bread was rising I mixed and cooked the pizza dough!
3 and 1/2 cups of the same bread mix
2 and 1/2 tsp active dry yeast
1/4 cup oil
1 and 1/2 cups hot water (hotter then your body temp but not hot enough to burn you)
you can add italian herbs to the dough and mix it in if you want as well. I don't usually do that, but I have been known to add a T. of baking SODA to the mixture just to help the crust be slightly fluffier and less like a cracker.
spray oil and flour pan and roll out-
bake at 350 for 10 minutes
 | |
| Again, throw it all in a bowl and mix it up (basically it's the same only doesn't use eggs) |
 |
| spray olive oil on pans and sprinkle with gf flour (I just use more of the bread mix) |
 |
| Divide the dough in half and plop it onto the pans. Sprinkle generously with more of the flour mix. |
 |
| More flour sprinkling... |
 |
| I have this awesome pizza roller that is totally worth it to get! If the roller sticks at all then sprinkle more of the flour mix and keep rolling till you get it out to the edge. |
 |
| let the dough rest for a bit (the instructions say to let it rise for an hour, but I can't see much difference when I do that) |
 |
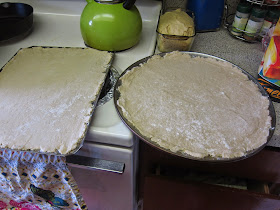
| Here's what they look like when they are all rolled out. You could be pickier with how the edge looks, but I don't really care so leave it how it rolls out. |
 |
| Bake for 10 minutes |
Final notes:
I HAVE made even better gluten free bread and pizza than the above, but the price or time didn't make it feel worth it compared to the slightly better taste. You might feel differently. Chebe' is another really great pizza crust mix that you can look for. It's higher in carb/starch content which doesn't hit my tummy the right way as a thing to do often, BUT for a change it's a nice alternative and it turns out fluffier instead of crispier for those of us who love the fluffy crusts more then the crispy.
If you have questions or if you have a favorite food that you'd like to ask if I know a gluten/corn alternative for, comment below and I'll see what I can do!


No comments:
Post a Comment